Getting Started#
Installation#
Unit tests in Polaris Studio are currently run in Python 3.12 (Ubuntu Linux) and Python 3.11 (Windows). As of July/25, Python 3.10 is also supported, although not consistently tested. We recommended using Python 3.12.
Python installations from the Windows store are NOT SUPPORTED
The Windows app store ships a version of Python that contains an sqlite dll that does not support the loading of extensions. This means that Spatialite will not be loaded, and therefore Polaris-Studio will not work properly.
For errors during installation and use, please refer to the Frequently Asked Questions
Using a virtual environment#
If you are installing polaris-studio from PyPi or wheel, we recommend first setting up a clean virtual environment to keep dependencies separated from your system python, if you are installing from Gitlab there is an integrated setup script which will do this for you.
Python’s virtualenv package is one way of doing this; you may prefer conda, uv, pyenv, or even to skip this step entirely if you’re confident there won’t be any conflicts.
The following shell snippets will make sure your pip is up to date and download the virtualenv library before creating a new virtualenv and activating it. After “activate” is called, the prompt in your shell should be prefixed with the env name (polarislib) and should behave normally, except that python packages will be loaded from / installed to the named environment rather than the system wide installation.
python -m pip install --upgrade pip
python -m pip install virtualenv
python -m virtualenv ~/virtualenvs/polarislib
source ~/virtualenvs/polarislib/bin/activate
python -m pip install --upgrade pip
python -m pip install virtualenv
python -m virtualenv c:/python/virtualenvs/polarislib
c:\python\virtualenvs\polarislib\Scripts\activate.ps1
python -m pip install --upgrade pip
python -m pip install virtualenv
python -m virtualenv c:/python/virtualenvs/polarislib
c:\python\virtualenvs\polarislib\Scripts\activate.bat
Besides closing the command line, you can exit the virtual environment by calling ‘deactivate’ from any directory.
Install/Update the package#
After activating your virtual environment, you need to install the polaris-studio package into that environment. We recommend installing using the high-speed uv installer, rather than the default pip install. Installing the package from the PyPI registry is as easy as:
python -m pip install uv
python -m uv pip install polaris-studio
At any point later that you want to update to a later version, just upgrade as you would any other Python package.
python -m uv pip install --upgrade polaris-studio
After activating your virtual environment, you need to install the polaris-studio package into that environment. We recommend installing using the high-speed uv installer, rather than the default pip install. If you’ve been provided with a wheel file you can install that using pip:
python -m pip install uv
python -m uv pip install polaris-studio-py3-none-any.whl
If you have a new wheel you want to install, the easiest approach is to uninstall the existing polaris-studio and install the new wheel as above.
python -m uv pip uninstall polaris-studio
python -m uv pip install polaris-studio-py3-none-any.NEW.whl
If you have access to the ANL GitLab server you may want to clone a copy of the source directly. This has the benefit of
being easier to update when new features are released or bugs squashed, it also has a setup script that automates the
creation of a virtualenv in the repo sub-folder venv. The downside of this approach is that it doesn’t provide
compiled POLARIS executables and you will need to provide your own when running models.
The following clones the repo and installs it into in editable (-e) mode.
git clone https://git-out.gss.anl.gov/polaris/code/polarislib.git
cd polaris-studio
.\setup_venv.bat
At any point later that you want to update to a later version, run a git pull and then restart any notebooks. If
dependencies have been added or updated you will also need to re-run the install with the upgrade flag.
cd polaris-studio
python -m uv pip install --upgrade .[dev]
If you have access to the ANL GitLab server you may want to clone a copy of the source directly. This has the benefit of
being easier to update when new features are released or bugs squashed, it also has a setup script that automates the
creation of a virtualenv in the repo sub-folder venv. The downside of this approach is that it doesn’t provide
compiled POLARIS executables and you will need to provide your own when running models.
The following clones the repo and installs it into in editable (-e) mode.
git clone https://git-out.gss.anl.gov/polaris/code/polarislib.git
cd polaris-studio
./setup_venv.sh
At any point later that you want to update to a later version, run a git pull and then restart any notebooks. If
dependencies have been added or updated you will also need to re-run the install with the upgrade flag.
cd polaris-studio
python -m uv pip install --upgrade .[dev]
Installation options#
In order to reduce the number of installed dependencies required for common workflows, polaris-studio utilizes a
partitioned
dependency set. This means that if you want to run a model, you don’t need to install dependencies that are only used
when building the network or analyzing results through a GUI. While basic dependencies will ALWAYS be installed,
additional sets are unlocked by adding the appropriate option(s) to the installation command, which install the required
dependencies. These options also apply when installing in editable model (-e) from a cloned repository.
hpc: This option includes the dependencies required to run the model on a HPC environment, such as the PG database connectivity required to coordinate runs and the globus data transfer tooling.
python -m uv pip install polaris-studio[hpc]
builder: This option includes all the dependencies required to run the model on a regular workstation, as well as access model-building tools, result analysis and GUI resources. This is the preferred option for those working with polaris-studio but not developing it
python -m uv pip install polaris-studio[builder]
dev: This option includes all the dependencies required by any resource in polaris-studio, as well as those needed for testing, document building and debugging. This is the option recommended for those developing polaris-studio, which only makes sense when installing from a cloned repository.
python -m uv pip install polaris-studio[dev]
Other options, such as installation of only linting requirements and documentation dependencies also exist, but their use is intended on Continuous Integration (CI) and Continuous Deployment (CD) pipelines only.
Command Line Interface#
polaris-studio provides a convenient CLI (command line interface) for a few key Polaris tasks, including running and upgrading models and building them from git.
The main thing to know here is that this interface is available only from within an active Python virtual environment and, once such environment is active, the interface is available from any folder/directory.
The polaris commands available are:
polaris run
polaris upgrade
polaris check
polaris get_demo
polaris build
polaris build_from_git
polaris aggregate_summaries
polaris download_binaries
polaris add_license
polaris test_spatialite
A simple example for this would be:
polaris build-from-git --data_dir d:/mymodel --city=grid --upgrade true
polaris run --data_dir d:/mymodel/grid/built --num_threads 18
The up-to-date configuration for which one of these commands is available by adding the parameter –help after the command you are interested in using, but the available parameters are listed below.
Installing the binaries#
The binaries for the POLARIS executable are included separately from the polaris-studio python library. This is done in order to save space for users who do not have a license for the executable, but still want to use the analysis capabilities in polaris-studio. Installing the binaries is easy using the download_binaries command:
polaris download_binaries
This will automatically download the binaries matching your version of polaris-studio into the default directory. You can also specify a release version to download and a director to download them to:
polaris download_binaries --version 26.03.13.dev1 --bin_path /path/to/bin
In order to be compatible with the maximum number of operating systems, we also have an apptainer image of the executable available for download. polaris-studio is setup to allow running this like a regular executable file, so you only need to download the .sif file instead:
polaris download_binaries --sif
# All of the other options are still available

polaris download_binaries --sif --version 26.03.13.dev1 --bin_path /path/to/bin
Installing the license#
While polaris-studio is free to use, the POLARIS executable used for running studies will not start without a license. To get one, please refer to the (page here)[https://polaris.taps.anl.gov/polaris/index.html]. Once you have received a license file from Argonne, you can install it in three different manners.
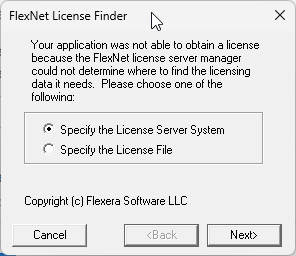
The first installation option is to use the GUI to point to the license file in the pace where it is will be stored
long term.
The GUI will become available once you first try to run Polaris, and it looks like the following:
# Activate your virtual environment
.\python_venv\Scripts\activate

# And add the license
polaris add-license --license_path "D:\Argonne\License 1.Lic"
On a Jupyer notebook or Python script you can add the license by calling the add_license method from
the Polaris class.
from polaris import Polaris

Polaris.add_license("D:\Argonne\License 1.Lic")
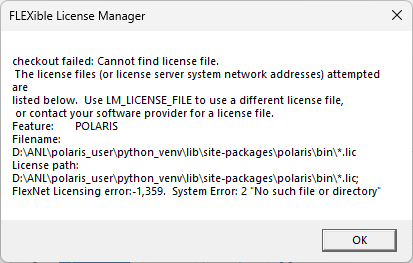
In case you fail to install the license or the license is not correct, you will receive a message like the one below.
Polaris run#
polaris run --help

>>> Options:
>>>   --data_dir TEXT                  Model directory  **[required]**
>>>   --config_file TEXT               Convergence control file override. Defaults to polaris.yaml
>>>   --num_threads INTEGER            Number of threads to use for model run
>>>   --population_scale_factor FLOAT RANGE
>>>                                    Population sampling factor [0.0001<=x<=1.0]
>>>   --upgrade TEXT                   Whether we want to upgrade the model to the latest structure before running it
>>>   --do_pop_synth / --no_pop_synth  Override the "should run population sythesizer" flag from polaris.yaml
>>>   --do_skim / --no_skim            Override the "should run skimming" flag from polaris.yaml
>>>   --do_abm_init / --no_abm_init    Override the "should run abm_init iteration" flag from polaris.yaml
>>>   --polaris_exe TEXT               Path to the polaris executable to be used. Defaults to the executable shipped with polaris-studio
>>>   --num_abm_runs INTEGER           Number of ABM runs to be run. Defaults to the value on polaris.yaml
>>>   --start_iteration_from TEXT      Start running from this iteration. Useful if restarting a previously failed run.
>>>   --help                           Show this message and exit.
Polaris upgrade#
polaris upgrade --help

>>> Options:
>>>   --data_dir TEXT      Model directory  **[required]**
>>>   --help               Show this message and exit.
Polaris build-from-git#
polaris build-from-git --help

>>> Options:
>>>   --data_dir  TEXT      Target model directory  **[required]**
>>>   --city      TEXT      City model to build - corresponds to the git repository **[required]**
>>>   --db_name   TEXT      DB name. Defaults to the value in abm_scenario.json
>>>   --overwrite BOOLEAN   Overwrite any model in the target directory. Defaults to False
>>>   --inplace   BOOLEAN   Build in place or a sub-directory. Defaults to subdirectory
>>>   --upgrade   TEXT      Whether we should upgrade the model after building it
>>>   --scenario  TEXT      Scenario to be built. Defaults to the base one
>>>   --help                Show this message and exit.
Polaris add_license#
polaris add_license --help

>>> Options:
>>>   --license_path TEXT                  Path to the license file to be used henceforth  **[required]**
Further exploration#
Managing and Analyzing Runs#
For larger studies it is advised to use python code directly, especially with Jupyter notebooks. Running Models covers management of POLARIS runs, how to define studies and setup large-scale runs, while Analyzing Models demonstrates how polaris-studio can help to investigate and visualize the output of these studies. There is also extensive documentation of data files used for POLARIS input and output on this website.
Understanding Inputs and Outputs#
The POLARIS simulation accepts a large number of inputs, the majority of which are kept in SQLite files. Supply contains the network, while Demand represents the vehicles and agents separate from Freight which is kept in it’s own file. Results from a run are stored in multiple files, including SQLite, HDF5, and OMX formats. More info can be found in Model Data Management.
Creating a model from scratch is a much more in-depth process, but an introduction can be found in Building Models. It is also critical to calibrate models to reach expected results before running forecasts and comparative studies using them, which is elaborated in Calibrating Models.